Detector Modes
Detect Early Signs of a Developing Landslide
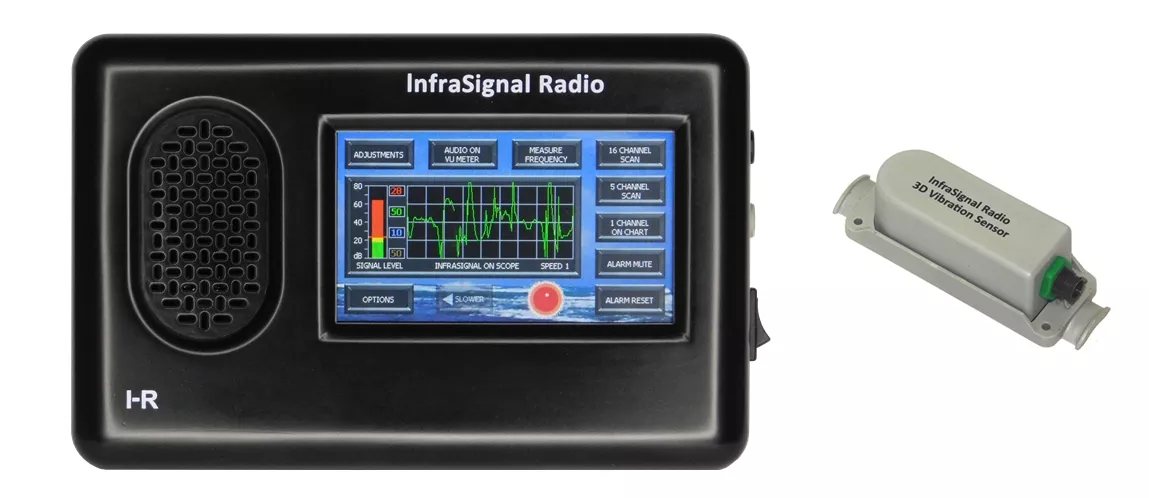
When the radio is used with a seismic (ground vibration) sensor, it can detect the early signs of a developing landslide. The United States Geological Survey (USGS), Federal Emergency Management Agency (FEMA) and Centers for Disease Control, (CDC) websites report lots of warnings signs before a landslide occurs. All of these warning signs involve small movements and vibrations in the ground. See (MUD, ROCK, LANDSLIDES).
It can also detect extremely weak seismic vibrations from other dangerous local sources such as Rock Slides, Mudslides, Flash Floods, Tsunamis, Earthquakes, Volcanoes and Tornadoes touching the ground.
This is the mode recommended for homeowners. In this display the scope shows a rambling and noisy signal from the 3D seismic sensor and the signal level bar graph shows an extremely strong signal level. A signal level of this magnitude would only be seen in extreme and dangerous conditions.
When the signal level first turns red, it’s a sign that a landslide might be developing. If it continues, evacuate immediately.
To set the system up to detect dangerous ground (seismic) vibrations from local sources, first, take note of the level on the SIGNAL LEVEL bar graph, then go to the OPTIONS page. Ensure that the ALARM IS ENABLED, then go to FAST AGC (Automatic Gain Control). FAST AGC will appear in the CURRENT AGC SETTINGS window. Then go to INFRASIGNAL ON CHART or GO BACK TO MODE >> ADJUSTMENTS and adjust the red ALARM threshold to just above the signal level you took note of on the SIGNAL LEVEL bar graph. Then go back to the INFRASIGNAL ON CHART or SCOPE. The alarm threshold is shown numerically and by the two red markers, one on each side of the green/yellow/red signal level bar graph. This may require several tries (ADJUSTMENTS page – MODE page – ADJUSTMENTS page etc.) before reaching the “no faults alarms” level.
If you get short burst of vibrations occasionally, try to identify the source and determine if they are benign. If they are not dangerous, the settings may be better if you set OPTIONS >> NORMAL AGC >> INFRASIGNAL ON CHART or GO BACK TO MODE and don’t use the FAST AGC option.
Every location and installation are different, so only local trial and error can determine the proper adjustments and settings to prevent faults alarms and yet be sensitive enough to detect very early rumbling of dangerous ground vibrations.
Detect EMP Pulse
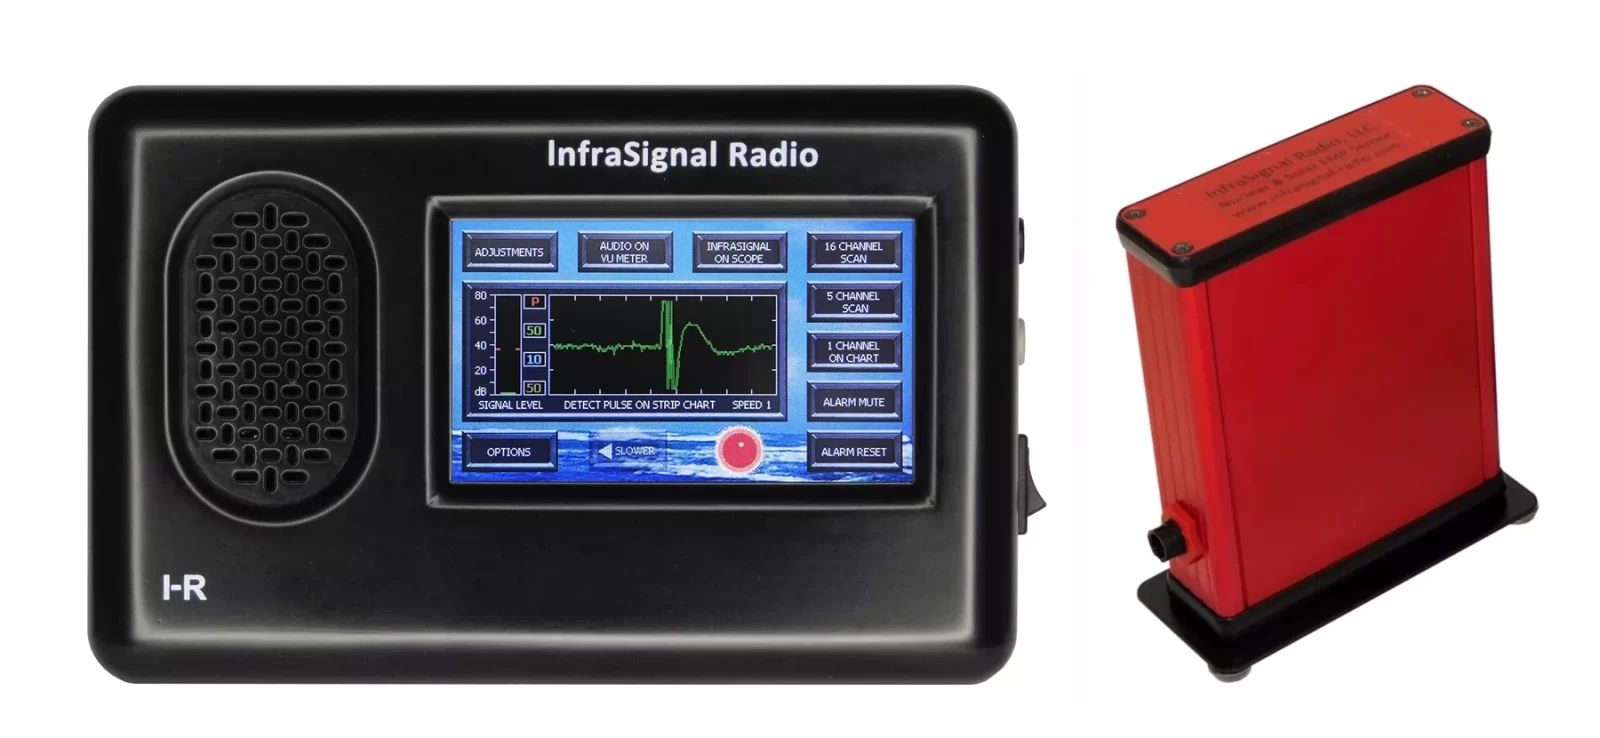
This is the recommended mode for those concerned with EMP. This mode is used with the Nuclear & Solar EMP Sensor to detect both sources of EMP.
In this display the strip chart shows a pulse that sounded the alarm immediately when it first appeared on the edge of the screen. Unlike the alarm system setup to monitor for seismic vibrations, the EMP Sensor setup does not require adjustments of the ALARM threshold. The EMP Sensor alarm setup works strictly with a magnetic pulse as seen on the DETECT PULSE ON STRIP CHART screen above.
The EMP Sensor components are housed in an aluminum shield and do not respond to a voltage signal, only a magnetic variation such as a magnetic pulse. The signal level as seen on the SIGNAL LEVEL bar graph to the left will always be very low except during a varying and prolonged Electromagnetic Pulse, (EMP).
To setup the system to detect a nuclear or solar EMP, go to OPTIONS >> NORMAL AGC >> FAST IMPULSE RESPONSE >> DETECT PULSE buttons. A red-letter P will appear in the CURRENT AGC SETTINGS window. This red-letter P indicates that the radio is setup to detect a fast pulse and sound the alarm. Select the DETECT PULSE ON CHART or the INFRASIGNAL ON CHART button. To monitor the system you can also use the INFRASIGNAL ON SCOPE mode. The system is now set up.
When an EMP is detected while using the detect pulse option, it is saved to nonvolatile memory very fast before the system loses AC power. When power is restored, (perhaps with a generator or backup battery) the alarm will sound and show a message that says “A pulse was detected before loss of power. To reset the alarm, go to OPTIONS >> ALARM TEST >> ALARM RESET”. This ensures that you are alerted to a NUCLEAR or SOLAR EMP and power loss, the two events occurring together.
The only way that this alarm condition can be reset, that is, when using the detect pulse option and after power is lost and then restored, is for a person to use the special sequence to reset it (go to OPTIONS >> ALARM TEST >> ALARM RESET. This special reset sequence is designed to prevent younger members of your crew from accidentally resetting it without your knowledge. They can easily mute the alarm sound, but unless they can read, it would be very unlikely they could reset the alarm.
When a less than severe NUCLEAR or SOLAR EMP occurs and the power is not lost, the alarm will sound until it’s reset. In this case, resetting the alarm is normal and does not require the special sequence.