Audio & Measure Frequency
Audio on VU Meter

The InfraSignal Radio has a regular audio mode. This mode is very useful when used with an infrasound microphone or an infrasound hydrophone whose frequency response also covers the audio frequency range.
Assuming you are monitoring an infrasound signal using one of the non-scanning modes i.e., INFRASIGNAL ON CHART, INFRASIGNAL ON SCOPE, 1 CHANNEL ON CHART, 1 CHANNEL ON SCOPE or FREQUENCY MEASUREMENT. You can switch to AUDIO ON VU METER to see if you hear a sound with the same rhythm.
This can help you identify the source of the infrasound. You can measure the frequency of this infrasound by using the procedure described in the MEASURE FREQUENCY paragraph. The ALARM function is not available in the AUDIO ON VU METER mode.
ON the right side of the radio is an ON/OFF power switch and two (2) phone jacks. These phone jacks, by design, require a more than usual amount for insertion force.
The top (black) phone jack outputs the infrasignal at a fixed level. This output is provided for recording and/or monitoring on a video display. When using the AUDIO ON VU METER mode, regular audio can be heard from this jack at a fixed level. This output is quite loud in most headphones.
The bottom jack (gray) provides regular audio and tone adjusted transformed infrasignal audio. The audio level from this jack is adjustable with the volume control. When a headphone is plugged into the audio phone jack, it disconnects audio from the speaker. It does not disconnect alarm sound from the speaker and alarm sound is not heard in the headphones.
Measure Frequency
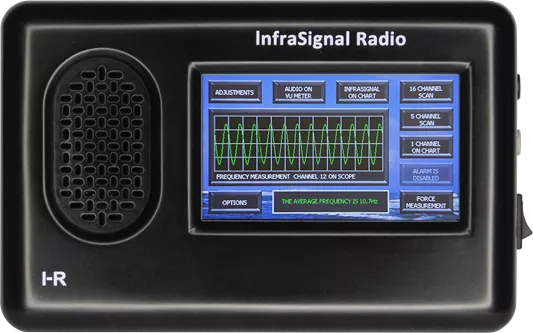
Measuring the frequency of a strong signal in one of the infrasignal modes is easy. Touch the INFRASIGNAL ON CHART >> INFRASIGNAL ON SCOPE >> MEASURE FREQUENCY buttons. The radio takes a sample of the signal and displays the frequency in green text in a window at the bottom of the screen.
If the signal strength decreases and a message appears in the window “WAITING FOR A STRONGER SIGNAL”, you can touch the FORCE MEASUREMENT button. This allows frequency measurements to be made all the way down to the noise level. The frequency measurements will be displayed in yellow text to indicate that the measurements are less accurate.
When the signals are not strong, it is recommended that frequency measurements be made using the 1 CHANNEL mode. The first step is to determine which channel displays the strongest signal. Touch the 16 CHANNEL SCAN button and make a full scan.
When you see which channel has the strongest signal, touch the 5 CHANNEL SCAN button and use the left CHANNEL button to back up. After the scan starts again and pauses in the channel with the strongest signal, touch the 1 CHANNEL ON CHART >> 1 CHANNEL ON SCOPE >> MEASURE FREQUENCY. The display will change to show the signal on the scope and an accurate frequency measurement in green text in the window below the scope.
Again, you may want to measure the frequency of a much weaker signal that falls below a level that ensures an accurate measurement. As before, a message appears in the frequency measurement window, “WAITING FOR A STRONGER SIGNAL”. Touch the FORCE MEASUREMENT button. The message disappears. The text in the frequency measurement window will turn yellow to indicate that the frequency measurements will be less accurate than those with the stronger signal.